
The Book
Implementing Mathematics with The Nuprl Proof Development System
See title page for important information about this reference
Next: The Rules Up: Index Previous: Proof Tactics Contents
- The Command Language
- The Library
- Window Management
- The Text Editor
- Tree Cursors, Tree Positions and Bracket Mode
- Moving the Cursor
- Adding Text
- Deleting and Killing Text
- Copying and Moving Text
- The Proof Editor
- Basics of the Proof Editor
- Motion within a Proof Node
- Motion within the Proof Tree
- Initiating a Refinement
- Showing Goals, Subgoals and Rules
- Invoking Transformation Tactics
- Definitions and Definition Objects
System Description
This chapter describes various parts of the Nuprl system: the command language, library, windows, editors and notation definitions. With the command language one can create, delete and manipulate library objects, evaluate terms, call up the editors, and ``check'' (i.e., parse and generate code for) objects. The library contains the various user-defined objects, the editors provide ways to modify them, definitions make them more readable, and the window system makes the editors more useful.
The Command Language
When a ``P>'' prompt appears in the command/status window,
the command processor is waiting for a command.#11891#>COMMAND}7.1Commands may be abbreviated to their shortest unique prefixes;
for example, check can be abbreviated to ch, and create
can be abbreviated to cr.
Typing errors are corrected with the DELETE#11892#>DELETE} key
(to delete a character)
and the ERASE#11893#>ERASE} key (
 ) to delete the whole line.
The commands are divided into four groups:
a group consisting of commands that control the library window,
a group consisting of commands that manipulate objects,
a group consisting of commands that allow work to be saved between sections,
and a miscellaneous group.
) to delete the whole line.
The commands are divided into four groups:
a group consisting of commands that control the library window,
a group consisting of commands that manipulate objects,
a group consisting of commands that allow work to be saved between sections,
and a miscellaneous group.
The following names are used in the syntactic descriptions below.

- is the name of an object in the library or one of the
reserved names first or last

- is or -.
This provides a convenient way to refer to a range of entries.

- is top, bot, before or
after .
(Top refers to the slot immediately before the first entry,
and bottom refers to the slot immediately after the last entry.)

- is thm, def, eval or ml.

- is any legal Unix or Lisp Machine file name, as
appropriate.
Optional arguments and keywords are indicated by curly braces.
Library Display
The library is a list of the objects defined by the user and may contain the theorems, definitions, evaluation bindings and ML code. Information about the library objects is displayed in the library window. The jump and scroll commands change what is being displayed in the library window, while the move command changes the order of library objects. The move command is often used to make sure that objects occur before their uses; this is important for correct library reloading.
- jump
-
The library is redisplayed so that the specified entry is visible. - move
-
The specified library objects are moved to the position just after the specified place. - scroll


-
The library window is moved the specified number of entries, in the specified direction. The default direction is down, and the default number of entries is one. For example, scroll 5 shifts the window down five entries, while scroll up shifts the window up one entry.
Manipulating Objects
These are the commands that directly manipulate objects. The most used of these commands is view, since most interaction with the system takes place within the editors started up by the view command.
- archive
-
For each object name specified a copy of the object is made and saved as the old version of the object. The library window is redisplayed if any of the archived objects are visible in the window. Note that there is no way to delete, modify or unarchive an object. - check
-
Each of the indicated objects is checked. Checking an object makes the objects defined therein available for use in other objects. When an object is checked, its status is updated, as is the status of any object that references any of the specified objects.7.2 If necessary the library window is redisplayed to show the new statuses.Checking a large theorem can take awhile. If the body of the theorem was dumped to a file and has not been fully reloaded (see the dump and load commands below) then checking the theorem brings in and reconstructs the body of the proof.
- create

-
A new library entry of the specified name and kind is created at the specified place. The library is redisplayed so that the newly created object is the first object in the library window. The object will be empty and its status will be RAW. - delete
-
The specified objects are removed from the library. The status of any entry depending on these objects is set to BAD. (This status change has been fully implemented only for definition objects.) - view
 object
 -
The object is displayed in a new window. If old is specified the archived version of the object will be viewed and the view will be read-only; otherwise, the unarchived version of the object will be viewed. If the object is not already being viewed the new view will be fully editable; otherwise, it and all other views of the object will be made read-only. The header line of the view will say SHOW for a read-only view and EDIT for an editable view.The editor used depends on the kind of object. The refinement editor (red) is used on theorems, while the text editor (ted) is used for other objects. For more information on ted and red see sections 7.4 and 7.5, respectively. Typing
 in an edit window will make Nuprl delete the
window and end its editing of the object.
If there are other edit views on the screen the cursor will be placed in one of
them; otherwise, the cursor will go back to the command window.
in an edit window will make Nuprl delete the
window and end its editing of the object.
If there are other edit views on the screen the cursor will be placed in one of
them; otherwise, the cursor will go back to the command window.
When view is done on a large theorem, it may take some time to activate red. If the body of the theorem has been dumped but not fully reloaded (see the dump and load commands below) then Nuprl reads the body in and reconstructs it before starting the editor.
Storing Results
The load and dump commands let one save results between Nuprl sessions.
- dump objects
-
Nuprl writes a representation of the selected objects from the current library to the file. If no filename is given the name of the last file to be loaded is used. The dumped objects are not removed from the library. - load place from filename
-
This is the command used to read in a file produced by dump. The decoded library entries are added to the library starting at location.
If an object in the dumped file has the same name as an object already in
the library, the object in the file is ignored.
When the load is finished a message is displayed giving the number of
objects loaded and the number of duplicates discarded.
The name of the loaded file is displayed in the header of the library
window.
Theorem objects are not fully reconstructed. The top of the proof (its goal and status) is loaded, but not the actual body of the proof (the rule applications and subgoals). The body is loaded on demand when the theorem is checked or viewed or when the extractor needs the body of the proof. When the body is actually loaded, the theorem's status is recalculated. If the new status is different from the status the theorem had when it was dumped, a warning is given.
Be sure to keep library objects correctly sorted; if an object ![]() is
referenced by an object
is
referenced by an object ![]() then
then ![]() must appear before
must appear before ![]() in the library,
or reloading will fail.
in the library,
or reloading will fail.
General Commands
This section contains those commands which do not fit in any specific category.
- eval
-
Puts the command window into eval mode.
The prompt changes from ``P>'' to ``EVAL>'' to
indicate the change.
Two kinds of inputs can be entered in eval mode:
terms and bindings.
Each input must be terminated by a double semicolon, ``;;''.
If a term is entered Nuprl evaluates it and prints its
value.
Bindings have the form
 --if a binding
is entered Nuprl evaluates the term, prints its value and binds the
value to the identifier.
The evaluator's binding environment persists from one eval session to the
next.
It also includes bindings made when EVAL objects are checked.
Eval mode is terminated by
.
--if a binding
is entered Nuprl evaluates the term, prints its value and binds the
value to the identifier.
The evaluator's binding environment persists from one eval session to the
next.
It also includes bindings made when EVAL objects are checked.
Eval mode is terminated by
.
- shell
-
Creates an interactive subshell.
This command is available only on the Unix version
of Nuprl.
Upon return from the shell
the screen is redisplayed with its old contents,
and processing is resumed where it left off.
The stty suspend character,
 , will
suspend
, will
suspend  without
creating a subshell.
without
creating a subshell.
On Lisp Machines select-L brings up a Lisp Listener window, and select-N returns to Nuprl. A select-N will leave the screen blank; use
 to redraw it.
- exit
- Terminates the current Nuprl session. Under Unix the user is returned to Lisp. To exit Lisp, use (exit). On a Lisp Machine the user is returned to the Lisp Listener.
There is one final command, the PRINT#11894#>PRINT} command
(
 ); it causes
a snapshot of the current screen image to be
appended to the user's snapshot file.
On the Unix version of Nuprl the snapshot file is
snap-
); it causes
a snapshot of the current screen image to be
appended to the user's snapshot file.
On the Unix version of Nuprl the snapshot file is
snap-![]() .
On Lisp Machines the snapshot file is snapshot.lisp.
.
On Lisp Machines the snapshot file is snapshot.lisp.
The Library
The library is a list of all the objects defined by the user and includes theorems, definitions, evaluation bindings and ML code. The library window displays information about the various objects-- their names, types, statuses and summary descriptions. In this section we give a short description of the different kinds of objects and their statuses.
Object Types
The library contains four kinds of objects: DEF, THM, EVAL and ML. DEF objects define new notations that can be used whenever text is being entered. THM objects contain proofs in the form of proof trees. Each node of the proof tree contains a number of assumptions, a conclusion, a refinement rule and a list of children produced by applying the refinement rule to the assumptions and conclusion. THM objects are checked only when a check command is issued or they are viewed or used as objects from which code is extracted.
EVAL objects contain lists of bindings, where
a binding has the form
![]() and is terminated by a
double semicolon, ``;;''.
Checking an EVAL object adds its bindings to the evaluator
environment so that they available to the eval command.
All EVAL objects are checked when they are loaded into the library.
ML objects contain
ML programs, including tactics, which
provide a general way of combining the primitive refinement
rules to form more powerful refinement rules.
Checking an ML object enriches the ML environment.
All ML objects are checked when they are loaded into the library.
and is terminated by a
double semicolon, ``;;''.
Checking an EVAL object adds its bindings to the evaluator
environment so that they available to the eval command.
All EVAL objects are checked when they are loaded into the library.
ML objects contain
ML programs, including tactics, which
provide a general way of combining the primitive refinement
rules to form more powerful refinement rules.
Checking an ML object enriches the ML environment.
All ML objects are checked when they are loaded into the library.
Library Entries
Every object has associated with it a status, either raw, bad, incomplete or complete, indicating the current state of the object. A raw status means an object has been changed but not yet checked. A bad status means an object has been checked and found to contain errors. An incomplete status is meaningful only for proofs and signifies that the proof contains no errors but has not been finished. A complete status indicates that the object is correct and complete.
An entry for an object in the library contains its status, type, name and a summary of the contents. The status is encoded as a single character: ? for raw, - for bad, # for incomplete and * for complete. A typical entry might be the following.
    ,--------------------------------------------------------,
    | Library                                                |
    |--------------------------------------------------------|
    | * simple                                               |
    |   THM   >> int in U1                                   |
    |                                                        |
    |                                                        |
    '--------------------------------------------------------'
The library window provides the mechanism for viewing these entries.
The entries are kept in a linear order,
and at any one time
a section of the entries is visible in the library window.
The library placement commands described in section 7.1 can be used to
change the order of the entries
and to move the window around within the list of entries.
Window Management
All interaction with Nuprl happens inside a window of one kind or another. Except for the command/status and library windows, which are permanent, windows are dynamically created and deleted as necessary. There are no explicit Nuprl commands to manipulate windows; their sizes, locations and foreground/background depths can be changed only by using the mouse.
Mouse Mode
When the terminal does not have a mouse, Nuprl uses the keypad to simulate one. MOUSE-MODE appears in the command/status window during this simulation. To enter mouse mode, press the MOUSE#11895#>MOUSE} key; to leave it, press DIAG#11896#>DIAG}. When the system is in mouse mode the screen cursor shows the position of the mouse cursor; the position of the normal cursor is remembered (though not shown) and is restored when mouse mode is left. Only the keypad keys are meaningful in mouse mode, and they have meanings similar to (though different from) their usual ones; the exact meanings are given below.7.3
Positioning the Mouse Cursor
In mouse mode the arrow keys move the mouse cursor in the following ways:
 ,
, 
-
Moves the mouse cursor up or down a line.  ,
, 
-
Moves the mouse cursor left or right a character. - LONG , LONG
-
Moves the mouse cursor up or down eight lines. - LONG , LONG
-
Moves the mouse cursor left or right eight spaces. - LONG LONG , LONG LONG
-
Moves the mouse cursor to the top or bottom of the screen. - LONG LONG , LONG LONG
-
Moves the mouse cursor to the left or right edge of the screen.
#11897#>}#11898#>}#11899#>}#11900#>![]() }#11901#>LONG}
All other keys and key combinations (except for
}#11901#>LONG}
All other keys and key combinations (except for
 ) are ignored.
Adjusting and Moving Windows
To adjust or move a window in the Unix implementation of Nuprl, get into mouse mode, move the mouse cursor to the window to be affected, and press MOUSE. A window command menu will pop up. Move the mouse cursor so that it inside this new window and on the same line as the desired command. Press MOUSE again. Some commands require a third MOUSE press; see the list of commands below for details. If the second MOUSE press is made when the mouse cursor isn't inside the menu, Nuprl will move the menu to wherever the mouse cursor is and will wait for a new second MOUSE press, to specify a window command.
On a Lisp Machine one may use the actual mouse;
follow the instructions above for Unix , but use middle-click
instead of the MOUSE key.
The commands and their meanings are as follows:
- PULL
-
Brings the window into the foreground.
Any windows which are on top of the window are pushed behind it.
- PUSH
-
Moves the window into the background.
This may cause it to be overlapped by or hidden by other windows.
All obscured parts of the window are remembered, though invisible.
- ...
-
Elides the window by shrinking it down so that only the header line is
displayed.
It also moves the window to the elided window area at the top right
of the screen.
If ... is invoked on an elided window it returns to the same
size and position it had before it was elided.
The contents of the window are not destroyed by this process;
they simply are not shown in the interim.
- MOVE
-
Upon a third press of MOUSE
the location of the mouse cursor will be the new
location of the upper left corner of the current window.
- SIZE
-
Also waits for a third MOUSE press.
The location of the mouse cursor will be the new location of the lower
right corner of the current window.
The location of the upper left corner will not change.
- KILL
- Destroys the window. This command is obsolete and should not be used.
Other Keys in Mouse Mode
The following keys have special meanings in mouse mode:
- SEL
- #11902#>SEL}
Is only meaningful if the mouse cursor is in a text editor window;
a SEL is done on the location nearest the mouse cursor.
(See section 7.4 for more information on text selections.)
- JUMP
- #11903#>JUMP}
This makes the view containing the mouse cursor the current view
(the view in which the normal cursor will be placed when mouse mode is
exited).
- DIAG
- #11904#>DIAG} Mouse mode is exited. The cursor will be in the window in which it was when mouse mode was entered (unless JUMP was used). If that window has been destroyed another window is selected.
The Text Editor
Nuprl text consists of sequences of characters and definition references (also known as def refs). Since these sequences are stored internally as recursive trees, they are also known as text trees, or T-trees. The text editor, ted, is a structure editor for these trees and works in a way similar to that of the Cornell Program Synthesizer; the cursor on the screen represents a cursor into the text tree being edited, and movements of the tree cursor are mapped into movements of the screen's cursor.
The text editor is used to create and modify DEF, ML and EVAL objects as well as rules and main goals of theorems. Changes to objects are reflected immediately; there is no separate ``save'' or ``unsave'' command.
The text editor is almost completely modeless.
To insert a character, type it;
to insert a def, instantiate it;
to remove a character, delete it or KILL it;
to move the cursor, use the arrow keys;
to exit the editor, use
.
There is a bracket mode, explained in the next section,
which changes the way def refs are displayed.
Tree Cursors, Tree Positions and Bracket Mode
A tree cursor
is a path from the root of a text tree to a
tree position, namely
a character, a def ref or the end of a subtree.
When text is being edited the tree cursor is mapped to a location on the
screen,
and this is where the editor places the screen cursor.
Unfortunately, more than one tree position can map to a screen
position.
Take the following definition of the ![]() relation:7.4
relation:7.4
<x>>=<y>==((<x><<y>) -> void).
In the tree represented by 3>=1 there are six tree positions:
the entire def,
the character 3,
the end of the subtree containing 3,
the character 1,
the end of the subtree containing 1 and
the end of the entire tree.
These six tree positions are mapped into four screen positions:
        3>=1
        ^^ ^^
The first is for both the entire def and the character 3,
the second is for the end of the subtree containing 3,
the third is for the character 1,
and the fourth is for the end of the subtree containing 1 and also for
the end of the entire tree.
If the screen cursor were under the 3, pressing the KILL key would
either delete the entire def or just the 3, depending on where the
tree cursor actually was.
To eliminate this ambiguity the window may be put into bracket mode; in this mode all def refs are surrounded by square brackets, and the screen position that corresponds to the entire def ref is the left square bracket:
        [3>=1]
        ^^^ ^^^
Notice that the right square bracket corresponds to the end of the subtree
containing 1; this gets rid of the other ambiguous screen position.
For another example of an ambiguity removed by bracket mode, consider the two trees
[23>=1] and 2[3>=1].
The first is quite reasonable, but the second is probably a mistake, since
it expands to 2((3<1) -> void).
In unbracketed mode both trees would be displayed as 23>=1.
The BRACKET toggle,
 , switches the current window into or
out of bracket mode.
It cannot be used in mouse mode.
, switches the current window into or
out of bracket mode.
It cannot be used in mouse mode.
Moving the Cursor
The cursor can be cycled through the edit windows with the
 key.
This is most useful when copying text from one window to another.
To move the cursor around within the current window, use the arrow and
LONG keys, as follows.
key.
This is most useful when copying text from one window to another.
To move the cursor around within the current window, use the arrow and
LONG keys, as follows.
- ,
-
Move the screen cursor up or down one line. The tree cursor is moved to the tree position that most closely corresponds to the screen position one line up or down. If the new tree position is not already being shown in the text window, scroll the window. - ,
-
Move the tree cursor left or right one position. That is, move one position backward or forward in a preorder walk of the tree. Keep in mind that this one-position change of the tree cursor doesn't always correspond to a one-column change of the screen cursor. - LONG , LONG
-
Move up or down four lines in the screen. If necessary, scroll the window. - LONG , LONG
-
Move the tree cursor left or right four positions. - LONG LONG , LONG LONG
-
Move up or down a screen. - LONG LONG , LONG LONG
-
Move the screen cursor to the left or right end of the current line. The tree cursor is moved left or right to match.
If LONG is used before any other key besides an arrow key it is ignored. (The LONG DIAG command works only in the proof editor.) Also, any extra LONGs are ignored.#11905#>LONG}
Adding Text
To add a character, simply type it; it will be added to the left of the current position. This also includes the newline character; to start a new line, press carriage return.7.5
To instantiate a def, use
 .
Nuprl will prompt for the name of the def in the command window with
I
.
Nuprl will prompt for the name of the def in the command window with
I![]() >; type the name of the def and press RETURN.
Nuprl will insert an instance of the def to the left of the current position
and move the tree cursor to the first parameter.
>; type the name of the def and press RETURN.
Nuprl will insert an instance of the def to the left of the current position
and move the tree cursor to the first parameter.
Deleting and Killing Text
There are two ways to remove a character.
The
 key (
key (
 ) removes the one at the current position,
while
the
) removes the one at the current position,
while
the
 key removes the one to the left of the current position,
assuming it is in the same subtree as the current position.
(If it isn't DELETE does nothing.)
To remove a def ref, use
.
The cursor must point to the beginning of the reference.
A selection of text may also be killed.
This involves three steps:
key removes the one to the left of the current position,
assuming it is in the same subtree as the current position.
(If it isn't DELETE does nothing.)
To remove a def ref, use
.
The cursor must point to the beginning of the reference.
A selection of text may also be killed.
This involves three steps:
- With the mouse or the
 key choose the left or right endpoint of
the selection.
key choose the left or right endpoint of
the selection.
- Select the other endpoint.
It must be in the same window as the first.
Also, if the first endpoint was within an argument to a def,
the second must be within the same argument.
- Press KILL; Nuprl will delete the two endpoints and everything between.
The killed text is moved to the kill buffer and can be used by the COPY#11906#>COPY} command (see below). Only killed text goes into the kill buffer; text deleted by DELETE does not.
There can be at most two selected endpoints at any time. If another endpoint is selected the oldest one is forgotten. When a KILL or COPY is done both endpoints are forgotten. The two selected endpoints must be in the same window; if they are not KILL and COPY will give error messages.
Copying and Moving Text
To copy text from one location to another, select it,
move the cursor to the
target location, and press the COPY key,
 .
If two endpoints were specified the selected text, including the endpoints,
is copied to the left of the current position.
If only one endpoint was specified the selected character or def ref is
copied to the left of the current position.
In either case all endpoints are forgotten.
.
If two endpoints were specified the selected text, including the endpoints,
is copied to the left of the current position.
If only one endpoint was specified the selected character or def ref is
copied to the left of the current position.
In either case all endpoints are forgotten.
To move text, use KILL and COPY together; if COPY is pressed when no selections have been made the kill buffer is copied to the left of the current position. Therefore, to move some text, select it, KILL it, move the cursor to the target position, and press COPY. The kill buffer is not affected by a COPY, so the easiest way to replicate a piece of text in many places is to type it, KILL it and then use COPY many times.
The Proof Editor
Nuprl proofs are sequent proofs organized in a refinement style. In other words they are trees where each node contains a goal and a rule application. The children of a node are the subgoals of their parent; in order to prove the parent it is sufficient to prove the children. (Nuprl automatically generates the children, given their parent and the rule to be applied; it is never necessary to type them in.) Not all goals have subgoals; for example, a goal proved by hyp does not. Also, an incomplete goal (one whose rule is bad or missing) has no subgoals.
In what follows the main goal (the goal for short) is the goal of the current node; a goal is either the main goal or one of its subgoals.
Basics of the Proof Editor
The proof editor, red (for refinement editor), is invoked when the view command is given on a theorem object. The proof editor window always displays the current node of the proof. When the editor is first entered the current node is the root of the tree; in general, the current node can be changed by going into one of its subgoals or by going to its parent. For convenience there are also ways to jump to the next unproved leaf and to the root of the theorem.
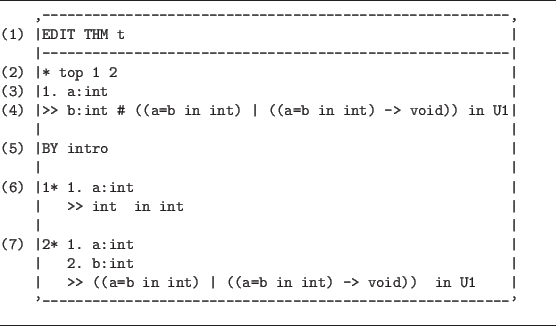
Figure 7.1 shows a sample proof editor window. The parenthesized numbers it contains are referenced below.
- The header line names the theorem being edited, t
in this case.
- The map, top 1 2,
gives the path from the root to the current node.
(If the path is too long to fit on one line it is truncated on the left.)
The displayed node is the second child of the first child of the root.
- The goal's first (and only) hypothesis, a:int,
appears under the map.
- The conclusion of the goal is the formula to be proved,
given the hypotheses.
The conclusion is shown to the right of the the sequent arrow, ».
In the example it is
b:int # ((a=b in int)|((a=b in int) -> void)) in U1. - The rule specifies how to refine the goal.
In the example the intro rule is used to specify
product introduction, since the main connective of the conclusion is
the product operator, #.
- The first subgoal has one hypothesis, a:int, and the conclusion
int in U1.
- The second subgoal has two hypotheses, a:int and b:int,
and the conclusion
((a=b in int) | ((a=b in int) -> void)) in U1.
Notice that lines (2), (6) and (7) have asterisks, which serve as status indicators. The asterisk in line (2) means that this entire subgoal has the status complete; similarly, the asterisks in lines (6) and (7) mean that the two subgoals also are complete. Other status indicators are # (incomplete), - (bad), and ? (raw).
Motion within a Proof Node
We first make the following definitions. The proof cursor is in a goal if it points to a hypothesis or the conclusion; it is at a goal if it points to the first part of the goal. If the cursor is not in a goal, it is at the rule of the current node or in or at a subgoal.
The cursor can be moved around within the current proof node in the following ways:
- ,
-
Moves the cursor up or down to the next or previous minor stopping point. A minor stopping point is an assumption, a conclusion or the rule. - LONG , LONG
-
Moves the cursor up or down to the next or previous major stopping point. A major stopping point is a subgoal, a rule or the goal. - LONG LONG
-
Moves the cursor to the goal. - LONG LONG
-
Moves the cursor to the conclusion of the last subgoal.
Motion within the Proof Tree
The following commands allow one to move around within the proof. They change the current node by moving into or out of subproofs.
-
Only has an effect when the cursor is in a subgoal; the node for that subgoal becomes the current node. -
Sets the current node to be the parent of the current node. The cursor will still point to the current goal, but the current goal will be displayed as one of the subgoals of the parent. - DIAG
-
If the cursor isn't in the goal DIAG#11907#>DIAG} moves it to point to the goal. If it is in the goal, the parent of the current node will become the new current node, (as in) and the cursor will point to
its goal (unlike ).
- LONG DIAG
-
Has the same effect as four DIAGs. - LONG LONG DIAG
-
Sets the current node to be the root of the proof. The cursor will point to the environment of its goal. - LONG
-
Sets the current node to be the next unproved node of the proof tree. The search is done in preorder and wraps around the tree if necessary. If the proof has no incomplete nodes the current node is set to be the root.
Initiating a Refinement
To refine a goal, a refinement rule must be supplied.
To do this, first move the cursor to point to the rule of the current node
and press SEL;
this will bring up an instance of the text editor in a window labeled
EDIT rule of thmname.
Type the rule into this window and press
.
Nuprl will parse the rule and try to apply it to the goal of the current proof
tree node.
If it succeeds the proof window will be redrawn with new statuses and
subgoals as necessary.
If it fails then one of two things may happen.
If the error is severe, the status of the node (and the proof) will be set to
bad, an error message will appear in the command/status window,
and the rule will be set to ??bad refinement rule??.
If the error is mild and due to a missing input,
Nuprl will display a HELP message in the command/status window
and leave the rule window on the screen so that it can be fixed.
If an existing rule is selected for editing Nuprl will copy it to the edit
window.
If the text of the rule is changed, then when
is pressed
Nuprl will again parse and refine the current goal.
When it does it will throw away any proofs for the children of the current
node,
even if they could have been applied to the new children of the
current node.
On the other hand, if the text is not changed, then when
is pressed
Nuprl will not reparse the rule.
Showing Goals, Subgoals and Rules
In some circumstances it is convenient to be able to copy goals or subgoals into other proofs. This can't be done directly, but there is a roundabout way. If SEL is pressed while the cursor is in a goal Nuprl creates a read-only text window containing the text of the goal. The window will be labeled SHOW goal of thmname. The copy mechanism of the text editor can then be used to copy portions of the goal to other windows.
There is a second way to SHOW a goal or subgoal:
move the cursor to it and press
 .
Nuprl will display the goal or subgoal with all definitions expanded
and all terms fully parenthesized.
This also works for rules.
.
Nuprl will display the goal or subgoal with all definitions expanded
and all terms fully parenthesized.
This also works for rules.
Invoking Transformation Tactics
Transformation tactics are tactics which act as proof transformers
rather than as generalized refinement rules.
To invoke a transformation tactic,
press
 (
(
 in some older versions).
This will bring up a text edit window labelled
Transformation Tactic.
Type the name of the tactic and any arguments into the window and press
;
Nuprl will call the tactic and redisplay the proof window to show any
effects.
If the tactic returns an error message it will be displayed in the
command/status window.
in some older versions).
This will bring up a text edit window labelled
Transformation Tactic.
Type the name of the tactic and any arguments into the window and press
;
Nuprl will call the tactic and redisplay the proof window to show any
effects.
If the tactic returns an error message it will be displayed in the
command/status window.
Definitions and Definition Objects
In Nuprl text is used to represent proof rules, theorem goals and and ML tactic bodies. This text is made up of characters and calls to text macros. Since internally pieces of text are stored as trees of characters and macro references, they are also called text trees or T-trees.
Text macros are used mainly to improve the readability of terms and
formulas.
For example, since there is no ![]() relation built into Nuprl,
a formula like
relation built into Nuprl,
a formula like ![]() might be represented by ((x<y) -> void).
Instead of always doing this translation one may define
might be represented by ((x<y) -> void).
Instead of always doing this translation one may define
<x>>=<y>==((<x><<y>) -> void)
and then use x>=y instead of ((x<y) -> void), thereby effectively
adding The left-hand side of a definition specifies its formal parameters and also shows how to display a call to it. The right-hand side shows what the definition stands for. In the example above the two formal parameters are <x> and <y>. (Formal parameters are always specified between angle brackets.)
The left-hand side of definitions should contain zero or more formal parameters plus whatever other characters one wants displayed. For instance,
        <x> greater than or equal to <y>
        (ge <x> <y>)
        <x>>=<y>
are all perfectly valid left-hand sides.
A formal parameter is an identifier enclosed in angle brackets
or an
<x:int1>>=<y:int2>==((<x><<y>) -> void)
the library window would show the following:
,-------------------------------------------------------,
| Library                                               |
|-------------------------------------------------------|
| * GE                                                  |
|   DEF: <int1>>=<int2>                                 |
|                                                       |
'-------------------------------------------------------'
If the description is omitted or void, the empty string is used, so that formal parameter is displayed as ``<>''.
Sometimes one wishes to use > and > as something other than angle brackets on the left-hand side of definitions. Backslash is used to suppress the normal meanings of < and >. To keep a < from being part of a formal parameter or to make a > part of a description, precede it with a backslash, as in
<x>\<=<y>==((<y><<x>) -> void)
and
square root(<x: any int\>0 >)== ... .
To get a backslash on the left-hand side, escape it with another backslash:
<x>\\<y>== ... .
The right-hand side of a definition shows what the definition stands for. Besides arbitrary characters it can contain formal references to the parameters (identifiers enclosed in angle brackets) and uses of checked defs. (Note: defs may not refer to each other recursively.) Every formal reference must be to a parameter defined on the left-hand side; no nonlocal references are allowed.
Here is an example of a def that uses another def:
<x>>=<y>>=<z>==<x>>=<y> & <y>>=<z>.
An example of a use of this def is 3>=2>=1, which expands ultimately
into ((3<2) -> void) & ((2<1) -> void).
Blanks are very significant on the right-hand sides of defs;
the three characters <x> are considered to be a formal reference,
but the four characters <x > are not.
Extra backslashes on the right-hand side do not affect parsing, although they do affect the readability of the generated text.7.6For example, the (unnecessary) backslash in
<x>>=<y>==((<x>\<<y>) -> void)
is displayed whenever the generated text is displayed.
For better readability it is best to avoid backslashes on the right-hand
side whenever possible.
The routine that parses the right-hand side of defs does backtracking to reduce the number of backslashes needed on right-hand sides. The only time a backslash is absolutely required is when there is a < followed by what looks like an identifier followed by a >, all with no intervening spaces. For example, the right-hand side below requires its backslash, since <x> looks like a parameter reference:
... == <f1>, 0\<x>> <f2>.
If the def were rewritten as
... == <f1>, 0<x >> <f2>
then it would no longer need a backslash.
Notice that the right-hand side does not have to refer to all of the formal parameters and can even be empty, as in the ``comment'' def.
(* <string:comment> *)== .
A use of such a def might be the following.
    ,-------------------------------------------------------,
    | EDIT main goal of thm                                 |
    |-------------------------------------------------------|
    | >> x:int # ( ... )      (* This text is ignored *)    |
    |                                                       |
    |                                                       |
    '-------------------------------------------------------'
Footnotes
- ...7.1
- If the cursor is within an edit window COMMAND must be pressed to get the ``P>'' prompt.
- ...7.2
- Note: This has not been fully implemented.
- ...7.3
- Note that if the command window is hidden from view, one can enter mouse mode unwittingly. If this happens it will appear as though Nuprl is not responding to any input except for the arrow keys.
- ...7.4
- A note for experienced users: no backslashes are required
in this def.
- ...7.5
- Carriage returns are significant only as delimiters.
- ... text.7.6
- Unlike, for example, the Unix program nroff Nuprl does not strip off backslashes when evaluating macros. They are stripped off only when text is actually parsed.